Contents
- 📋 Prerequisites & What You Need
- 🔧 Step 1: Choose the Right Shelf and Hardware
- ⚙️ Step 2: Prepare the Wall
- 🎯 Step 3: Mark the Wall and Drill Pilot Holes
- ✅ Step 4: Install the Wall Anchors and Shelf
- 🚀 Step 5: Add Finishing Touches
- ⚠️ Common Mistakes & How to Avoid Them
- 💰 Cost & Time Breakdown
- 📊 Expected Results & Metrics
- 💡 Pro Tips & Advanced Techniques
- Frequently Asked Questions
- References
- Related Topics
Overview
Before you start, make sure you have all the necessary tools and materials, including a level, drill, wall anchors, and shelf hardware. It's also a good idea to consult with a professional if you're unsure about any part of the process. You can find a variety of shelves and hardware at stores like Home Depot and Lowe's. For a more unique and stylish shelf, consider checking out Etsy or Craigslist. For a wide selection of shelves, visit Wayfair or Amazon.
🔧 Step 1: Choose the Right Shelf and Hardware
The first step in hanging a shelf is to choose the right type of shelf and hardware for your needs. Consider the weight and size of the items you'll be placing on the shelf, as well as the style and material of the shelf itself. You can choose from a variety of shelf types, including floating shelves, corner shelves, and adjustable shelves. For a more modern and sleek look, consider a shelf made from reclaimed wood or metal. Check out IKEA for affordable and stylish options.
⚙️ Step 2: Prepare the Wall
Once you've chosen your shelf and hardware, it's time to prepare the wall. This involves locating the wall studs and marking the spot where you'll be drilling the pilot holes. You can use a stud finder to locate the wall studs. For a more accurate reading, consider using a laser level to ensure the shelf is perfectly level. You can find a variety of stud finders and laser levels at stores like Amazon and Walmart. For a professional finish, hire a handyman from TaskRabbit.
🎯 Step 3: Mark the Wall and Drill Pilot Holes
With the wall prepared, it's time to mark the spot where you'll be drilling the pilot holes. Use a level to ensure the mark is straight and a pencil to mark the spot. Then, use a drill to drill the pilot holes, which should be slightly smaller than the wall anchors. For a more precise hole, consider using a drill press or a hand drill with a drill bit. You can find a variety of drills and drill bits at stores like Sears and Northern Tool. Check out YouTube tutorials for guidance.
✅ Step 4: Install the Wall Anchors and Shelf
The next step is to install the wall anchors and shelf. This involves inserting the wall anchors into the pilot holes and screwing them into place. Then, you can hang the shelf on the wall anchors, making sure it's level and secure. For a more secure installation, consider using wall anchors specifically designed for heavy loads, such as those made by Rubbermaid or 3M. For a professional finish, consider hiring a contractor from Thumbtack.
🚀 Step 5: Add Finishing Touches
The final step is to add any finishing touches, such as decorative trim or paint. This will help to cover up any imperfections and give the shelf a polished look. For a more unique and stylish look, consider adding some decorative molding or wall decals. You can find a variety of decorative trim and paint at stores like Sherwin-Williams and Benjamin Moore. Check out Home Depot for a wide selection of decorative items.
⚠️ Common Mistakes & How to Avoid Them
One common mistake people make when hanging a shelf is not using the correct type of wall anchor. This can lead to the shelf falling off the wall, which can be dangerous and costly. To avoid this, make sure to use wall anchors that are specifically designed for the type of wall you have and the weight of the shelf. For example, if you have a drywall wall, you'll need to use drywall anchors to ensure a secure installation. You can find a variety of wall anchors at stores like Home Depot and Lowe's. For expert advice, consult This Old House.
💰 Cost & Time Breakdown
The cost of hanging a shelf can vary depending on the type of shelf and hardware you choose. The time it takes to hang a shelf can also vary. For a more efficient installation, consider hiring a professional from TaskRabbit or Handy. Check out Angie's List for trusted professionals.
📊 Expected Results & Metrics
To ensure a level installation, use a level and a stud finder to locate the wall studs. You can also use a laser level to ensure the shelf is perfectly level. For a more accurate reading, consider using a leveling kit or a shim to adjust the shelf to the perfect level. Check out Fine Homebuilding for expert tips.
💡 Pro Tips & Advanced Techniques
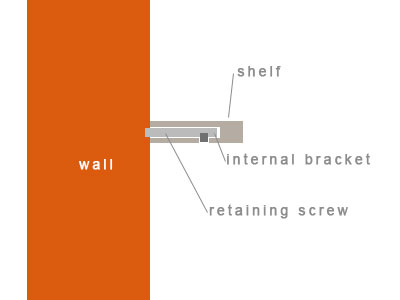
For a more advanced installation, consider using a hidden bracket system, which can provide a sleek and modern look. You can also use a decorative bracket to add a touch of elegance to the shelf. For a more unique and stylish look, consider adding some LED lighting or under shelf lighting to the shelf. You can find a variety of hidden brackets and decorative brackets at stores like Wayfair and West Elm. Check out HGTV for design inspiration.
Key Facts
- Year
- 2020
- Origin
- United States
- Category
- wellness
- Type
- concept
- Format
- how-to
Frequently Asked Questions
What type of shelf is best for a heavy load?
A shelf with a sturdy frame and hidden wall fixings, such as a floating shelf, is best for a heavy load. You can find a variety of floating shelves at stores like IKEA and Crate and Barrel. Check out Amazon for customer reviews and ratings.
How do I ensure a level installation?
Use a level and a stud finder to ensure a level and secure installation. You can also use a laser level to ensure the shelf is perfectly level. For a more accurate reading, consider using a leveling kit or a shim to adjust the shelf to the perfect level. Consult This Old House for expert advice.
What type of hardware is best for a drywall wall?
A drywall anchor is best for a drywall wall, as it provides a secure hold with the wall.